Friday 9 December 2016

Installing Gas Heating

It is winterly, and the temperatures are low. Or at least they have been low in the past few weeks - right now is actually a quite mild weather.

But in any case, if I want to work on the LDV, I can only do this in the evening, because I have to work in my regular job during the day. I have now sorted the electricity with putting the leisure battery there and wiring it up, so there is light to work in the evening. But I still did not have any heating. My plan had been to install that refurbished water heater, which I purchased a few years ago, and which runs on plain Diesel fuel. But I have not yet figured out how to safely connect it to the vehicle fuel system, and so the heater is still in its box.

But since I need heating eventually, I decided to remove the blown air heater which I had installed in my Peugeot Expert four years ago. It is gas powered, and seems easy to set up and connect. So in the past few days, as the weather was not too cold, I did undertake this installation.

First I did remove the heater from the previous vehicle. Unscrewed the copper gas line, removed the two pipes which go out to the bottom of the vehicle: one is the air intake, the other is the exhaust output. I unplugged the wiring from the heater, then I could easily take it out.

The heater, with the cover of the electrics removed. The power and the control cables are already disconnected.
I had now to find a spot where to mount it. I wanted to avoid the hot exhaust fumes going near the LDV main Diesel tank which is on the vehicle's driver side (right side). So I did decide to put the heater on the opposite side. It will be there underneath the future sink and cooker installation, so the location of the gas supply on that side does make sense.

I placed the heater just before the rear wheel arch. This places it about in the center of the whole "living" area, which seems about right to me. I did place it along the vehicle axis, to ensure that it would not take up too much space. My plan is to have a quite narrow work surface for cooker and sink, because there must also be space for a walk-through way, and on the opposite side will be the enclosed bathroom which may take a bit more space.

Now I had to drill into the floor through the bottom these two holes for the two hoses: the air intake and the exhaust. I started to drill two pilot holes - worked fine, through the floor board and the metal underneath.


The two pilot holes from the vehicle underneath.
The two pilot holes from inside the LDV. I had here already used the circular cutting drill.
More difficult was now to make the holed wide enough for the hoses. I have a set of circular ring drills, which work fine cutting the circles out of wood or plywood, like through the floor. But these circle drills are not suitable to cut through metal: it was just barely scratched, and the drill just kept getting stuck. So I had to resort to another method: with a thick regular metal drill I enlarged the pilot hole,then I used a jig saw to cut out the circle shape. Did work OK, but I broke one of the saw blades when trying to cat the metal from underneath the vehicle. It worked fine when I did the cutting from the inside. Overall not a very nice cutting - due to a lack of proper tools my "circles" have quite rough edges. But the two hoses fit through well, and I was able to attach the heater on the top and connect the hoses through the bottom.

The light air intake hose I attached with some plastic cable binders along the structure which keeps the spare wheel underneath in place. The metal exhaust hose I temporarily attached with bungee cords into location, so that the hot exhaust air does not hit the rear tires which are nearby. I will have to add metal brackets and affix the hoses more permanently, but for now it is OK.

Then I needed to connect the electrical wiring. Was simple. For removing the control unit from the previous vehicle I had to disconnect the unit from the cable, to be able to pull the cable out through where it had been installed. No problem assembling it together again. Electrical power is coming from the leisure battery.

Wiring at the electronic thermostat controller. I may fiddle with this in the future for creating a remote control switch-on.
The final step was to connect the gas supply. I had purchased an 8mm gas hose, suitable also for high pressure. I did connect again the copper pipe to the gas heater, then connected it through the hose to the gas bottle.

This whole setup is only temporary, as I wanted to see if the heater is working. In the future I will make all of this more permanently, with all copper gas pipes secured to the wall, and with valves for shutting off gas supply. But for now I kept the valves out of the installation and only shut down the gas supply at the gas bottle itself.

Switching on the heater worked immediately fine, and a good warm air came out of the heater. So now no worries about cold nights!

I currently only have a Butan supply, but I will get a Propan gas bottle, so that I can also start heating at lower temperatures. In the final version I want to have the LPG refillable Gaslow container installed, which is currently in the Peugeot Expert. But that one seems to leak gas when being used - I need to bring it into the shop to check int and fix that gas leak which seems to be at the top of the Gaslow bottle valve.

Heating in operation, fully  functional.


Monday 28 November 2016

Fixing the Window Seal

Already a while ago I had rang the company AutoGlass, to find out if they could fix a window seal. They declined - they only exchange full windows, and they do not repair seals.

I then found another company on eBay which would sell a full LDV front window - and that company is in Leeds! So I rang them, and yes, they also replace seals only. But they could not give a guarantee that the old window would not break. Depending on the condition of the old seal it might be impossible to get the window out or back in without breaking it. Well, that was a risk I had to take.

The window glass would be a bit below £90. The seal is £30, and the labour is £50. Reasonable. So today the two guys from YPM Windscreens came in the afternoon and began working on it. Yes, it was a bit hard to get the window out, and in particular to get it in again, because there was very little clearance at the top where the roof is attached in the front.

But they managed, and now I have a brand-new seal which hopefully will stop any water from coming in. I still have to make sure that the water that is already in gets dried out.

YPM have arrived, preparing for window removal.

Here is the LDV without front glass window. A rare sight, I hope!

The new rubber seal is affixed to the old glass window.
Some grease is put in place to allow the rubber to slide into place easily.

The new rubber is almost there on the old glass window.

And now the window is put in place with the new rubber seal.

Almost done!


Saturday 26 November 2016

Wiring up the Leisure Battery

When trying to decide which leisure battery to get, I had the choice of either spending as little money as possible now, or go for something really good.

Halfords had a good sale on a 110 Ah leisure battery for less than £100. But I found the XV190MF at Tayna:  https://www.tayna.co.uk/XV190MF-Powerline-Leisure-Battery-P8959.html nominal a 110Ah battery, with a slightly reduced capacity depending on the current drawn. The argument for this battery was the price: only £43, which I found reasonable. Maybe in a few months I add another identical battery to boost the overall capacity.

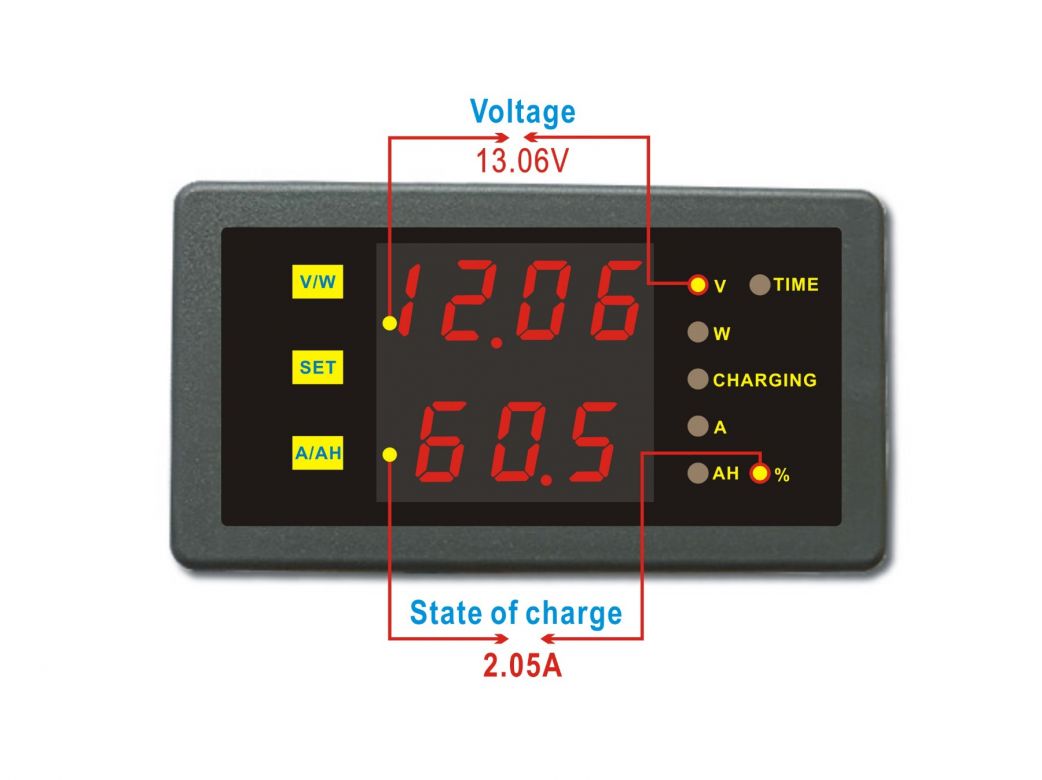
Then I got a few wires, cables, and the important volt/ampere meter: http://www.ebay.co.uk/itm/152102998570?_trksid=p2057872.m2749.l2649&ssPageName=STRK%3AMEBIDX%3AIT on eBay, sent directly from China. I already had used this device before, and it is great because it goes simply between the battery and the consumers resp vehicle electrics, without the need for a separate resistor to measure current. Also this device shows current in both directions, so I can monitor if the battery is getting charged or is getting depleted.

I got a three-for-price-of-two deal, which means this device costs just £10. I am not using it to monitor Ah, but directly the flowing current in Ampere.

The wiring up meant I needed to get somewhere the +12V from the vehicle electric system, which would then be connected via the split charge relay TEC3M (costs around £11) to the leisure battery. I took the +12V from the cigarette lighter: at least this line usually can provide up to 20A, and it was the only line which I could easily reach. The leisure battery will then be charged from the vehicle electric system, when the engine is running and the vehicle voltage is above 14V, generated by the alternator. I like these inexpensive TEC3M relays: they can switch up to 30A, and they provide an additional contact for "fridge", which I use to connect an LED which lits up when the relay connects both batteries.
 

I added a circuit breaker in that power connection, which I also use as a switch to disconnect both batteries, if I want to. I used a 60A circuit breaker http://www.ebay.co.uk/itm/181592244962?_trksid=p2057872.m2749.l2649&ssPageName=STRK%3AMEBIDX%3AIT - in my experience the actual current flowing between the batteries is usually not more than 5Ampere.


So now the setup is completed, and the leisure battery is being charged whenever I drive with the vehicle.

I put the leisure battery in a battery enclosure which I still had left over from my previous campervan work. It now stands under the rear seat. Will need to be more rigidly affixed to the vehicle, but for now it is OK. It is so heavy that it usually does not slide around.

Now I can begin wiring up more of the electric circuits in the vehicle which will be powered by the leisure battery, for example additional LED lamps.

Leisure battery behind one the passenger seat row. The wiring already includes the volt-/amperemeter.

Wiring is at the moment only loose, in a cardboard box. Here is the TEC3M relay wired up.


Thursday 24 November 2016

First Service

Since I have no idea about when the vehicle had its last service, I decided to give it a full service. Looking online for LDV service station I came across the Horforth Towbar Vehicle Service (HTVS). I had already been there for fitting towbars to my previous vehicles, so I knew they were reliable. Also they had good reviews online. So I left the LDV there for a day and paid for the service (£198).

Turns out that most things are OK. But a few things need to be fixed soon: front brakes are worn and need to be replaced (both the disks and the pads; disk has a crack, which was noted in the MOT advisory). One ball bearing needs to be replaced. And the brake fluid must be changed.

Not much then actually. Also the front window seal is the culprit which lets water through, so I need to fix that.

And next year the kingpins need to be replaced. I read already a lot about this - it is a weak spot of any LDV, as these kingpins wear out, and are difficult to replace. But I can do this then next year, before the next MOT.

Sunday 20 November 2016

A First Wash

Now that the vehicle can be out on the road after the taxation issue has been solved, I decided to have the vehicle undergo a thorough wash. At the Hand Car Wash I drove up on Sunday afternoon. £20 for a complete wash, £15 for a more superficial wash. Since it was quite cold outside, I decided not to let the roof being scrubbed, but just the side walls.

Here is someone just cleaning the front window:


And here is how the van looked after the wash - quite presentable now:


Friday 18 November 2016

Driving to Uni


First time at Headingley Campus of  Leeds Beckett Uni, my work place. I have to find a large parking spot, where I can easily get in and out of the large vehicle. This is in front of the cafeteria.

Monday 14 November 2016

Taxation Hell - Part 2

After I had sent all my documentation to DVLA on 19 October, I did receive a letter from them on 1 November, telling me that I need to provide the following:
1) a statement about the use of the vehicle. Needs to state that I use it solely for private purposes, without any business use.
2) Photos of the van, to document evidence that this is indeed a minibus and not a panel van as stated in the logbook.

So I quickly took 4 pictures (registration plate visible) and sent this to the DVLA, together with the statement, on 2 November.

After more than a week the taxation status of this van still was showing up as "untaxed", so I decided to ring the DVLA on Friday, 11 November. Spoke to a nice and friendly bloke there, who told me that I just need to wait - he could not confirm if my letter has been received. He told me he would call me back once he had info about the status.

I did ring again on Monday, 14 November - still nothing there about my documentation that I had sent. Which meant that I still was not able to take the vehicle out on the public streets. But then I received a phone call in the afternoon from him, and he told me that he did indeed now receive the application, and a colleague of him has processed this. So the van is taxed now - Halleluja!

A positive outcome, and I have now four pics of the van:


Friday 11 November 2016

Window Tinting

While waiting for the tax to be processed, I was not able to drive the vehicle on public roads. But I could begin with some of the conversion tasks. One of the easiest and also most urgent was to tint the windows. Since in the beginning I would just use this van to transport things back and forth, I did not want to have all of these things be visible from the outside.

So I ordered some window tinting foil and began working. But there was a problem: there are four windows, each 1.50 m long. Quite a large distance, and I had big difficulties in applying the foil. I did screw up a few times my first attempts in attaching the foil. The problem was that once the sticky side of the foil got attached to itself, it was basically ruined because when trying to untangle the stuck parts, they tore away the tinging cover on that foil, and ugly folding marks with un-tinted parts remained.

I ruined basically 6 m of foil, before I had a better idea: to use a stable bar, at least 1.50m long, where I could attach the top part of the foil before I would remove the transparent foil protection over the sticky part. This would keep the tinting foil straight until it is applied to the window.

And it worked - I did order a new set of tinting foil, and was able to complete the tinting of all four windows in 2 hours. Just to let you know about the process: one has to spray soapy water onto the window (not using Ammoniak solution, therefore not using windows cleaner; I did add dish detergent into the water spray bottle, which then worked fine). Then one has to remove the transparent protective foil from the tinting foil, which then exposes the sticky side of that tinting foil. Now the foil can be pressed onto the wet window. Having the window wet allows the foil to be adjusted and shifted into place, before it is stuck to the window. With a squeegee the water underneath the foil is then squeezed out towards the border of the window, where it then can escape. Bubbles under the foil which remain can still be removed with that method at a later time.

I must note that the quality of the foil which I ordered the 2nd time was much better than the one I had the first time: The foil was a bit sturdier, and an occasional self-stick did not result in destruction of the foil, but I could just carefully lift it off and continue working. Not sure how long these links are still valid, bu this is the one that I did use in the end and which was very good to work with: 6m x 76cm 95% . And this is the one which I had previously used and had failed to apply it due to the large window size: 6m x 75cm, 95% .

I did use 95% blocking / 5% transmitting foil - is quite dark now inside, and I am considering using a 10% transmitting foil, should I be tempted to re-do the tinting at some point. The reason for considering this re-doing is that when cutting the edges of the foil off, I did not do a very good job: I did sometimes cut a bit too much, so there are some areas with a fully transparent edge frame now visible. Still, overall not too bad, and for now I can let it.

Here is how the van now looks with the tinted windows:


Friday 28 October 2016

Selling the Seats

The seats have now been sold and collected. Now I can use the empty space to store tools and equipment for the conversion. I felt a slight pity letting these seats go, because they had a custom cover that fit well to the rest of the interior. But this shall not be a bus... but a "motor caravan". I kept two seat benches: on the driver side there is now the dual seat, and on the passenger side is the single seat with the tray next to it.

Here is how the seating looks now:


And here is how the back space looks:


Thursday 27 October 2016

Project Updates

The seats: sold. Last week, James from Rotherham became the highest bidder for these 8 seats which I wanted to get rid of. Today he came and picked them up.

The tax: still unresolved. I had sent everything in to the DVLA last week, but the vehicle still appears as being un-taxed. I was told that it may take 10 business days. So I will wait until mod next week then, before I can take the vehicle on the road.

The water ingress: Last week I put some duck tape on parts of the front windscreen seal where I suspected that water would come in. There was still water on the front side under that rubber mat, near the driver's seat. I put a few more patches on the seal, will have to see if the amount of water is increasing or decreasing.

The rust: I removed bits of rust along the wheel arches and at the lower edges of the side panels. Used rust desolver to convert the rust back to metal. Also put a bit of white primer on some of those rusty parts. Most is only surface rust, but on one spot the rust has eaten through the metal and has made a small hole. I probably have to fill this. The repairs are currently mostly cosmetic.

The mileage: I checked on the DVLA website: https://www.gov.uk/check-mot-history where one can just enter the registration and make and get a MOT history back to 2005. This provided more information than the vehicle history check for which I paid.... The DVLA site shows a consistent low mileage, beginning with 5867 miles back in March 2006. Annually there were not more than 3000 miles driven in average. So the low mileage appears to be correct. Except that possibly before 2006 there could have been some kind of excessively high mileage.

Further plans: Are for now put on hold. I first will use the vehicle as a transport van. Still have to find a good way of attaching the window tinting film. My previous attempt in the past two weeks were unsuccessful, as the large window area was difficult to manage. The foil crinkled and tore. I have to either find a better foil (maybe 3M ?) or have a company do that professionally.

Friday 21 October 2016

Removing the Seats

There are six rows of seats which I wanted to remove, as I do not need them - in their place will be the installations of the motorhome, for example the bed, the hob, the shower / toilet, the sink etc. I am going to keep one row of seats, the one right behind the driver. This would be a total of three individual seats: one double seat behind the driver, and one single passenger seat on the passenger side. My plan is to replace those seats by two swivel seats, so that I can make a sitting area for dining and working right in the front of the vehicle.

The seats to be removed are: four single seats, and two double seats, giving a total of 8 seats. I did place an advert for them on eBay.

Removing the seats was not very difficult. I needed a 17mm wrench / spanner to loosen the six screws with which each of the chairs was attached to the sliding rail on the floor. Problematic were the two seats which are over the rear wheel arches: they have a specially constructed frame, which appears to be screwed into the floor and is fixed with screwing bolts from both sides. Which means, I would have to go outside under the wheel arch and unbolt this from there, as I was not able to loosen the screw head from the inside. So for now I just left these two frames there, will not sell them, unless the buyer can provide some means of loosening them.

Mounting of seat over left rear wheel arch.Dismounted single seat.


Monday 17 October 2016

Taxation Hell

Already last week on Friday I tried to tax the vehicle at my local post office. The woman at the window - the branch manager - tried to get me the tax quote for paying by direct debit, in monthly instalments - "computer says no". Is not possible to pay in monthly instalments. OK, so I will pay for 6 months. After a while "computer says now" - is not possible. What the heck? I have the full V5C form, and also the renewal letter with the special code to enter. But that latter one is of course only valid for the previous owner, therefore I have not tried to renew online. The woman tries again - then says "you do not need to pay anything". It comes indeed up as zero. Suddenly it dawned on me: must be because this is a disabled transport vehicle. Is therefore exempt from tax. And when looking at that tax registration letter, it indeed states zero. So the woman calls DVLA - and after 15 minutes she tells me that I need to contact DVLA directly - the post office cannot do this.

So I go home. I had a look at the DVLA website, and found there that one can change taxation class from exempt to non-exempt - and one can do that at the post office. So on Monday I went again to the Post Office, but the guy said it was not possible. I had figured out that I would need to apply for a Private Heavy Goods Vehicle (HGV), but the only options coming up on the Post Office computer were to register the vehicle as a Private Light Goods Vehicle (LGV). For whatever reason, tax for a Private HGV is lower than for a Private LGV: HGV is £165 per year, and LGV is £230 per year. Of course I wanted the lower price, especially because officially the vehicle is listed as having 3850 kg gross revenue weight. The limit for an LGV is 3500 kg. OK, the guy at the window says he cannot change the tax code, and I would need to call DVLA. There is no option on his computer screen to change the tax code - I only could tax it as an Private LGV.

So I ring DVLA. I explain everything and provide the data / registration etc. He says that I should go to the Post Office and tell them that they should ring the DVLA help line. Then they would get clear instructions on how to change the tax code.

With that information I am heading again to the Post Office, for the third time now. This time I am going to another one, because maybe these guys where I went the first two times have no clue. But that other post office does not deal with car registrations. I go to another one, a bit further away. Also here no avail - they do not deal with vehicle registration and taxation. So back to the one where I had been before - for the third time. The guy already recognises me. I try to convince him that the DVLA has told me that this tax code change can be done at the Post Office. But he insists that it cannot be done. On Friday his manager had rung DVLA, that special help line, and they had told them that this can only be done directly by me interacting with the DVLA.

So back to the phone, I ring again DVLA. This time I insist that the Post Office is not able to do this, and that I need to tax the vehicle now over the phone. Finally the person on the other end of the line acknowledges that the Post Office cannot do it. I have to file a form V85, add the original MOT, fill in section 7 of the V5C form, and add a check / postal order. Fortunately they did not ask me to provide a form 27 B/6...

Checks - how quaint. I think I still have some in some drawer... have not used checks in 10 years. Is not possible to pay by credit card or any other online means... so I go again to the Post Office, for the fourth time. The guy there is laughing. A Postal Order costs £12.50. Must hand over cash, get the cash from withdrawing it from the bank account right there with the cash machine. Weird system... But at least my vehicle will now be taxed properly as a Private Heavy Goods Vehicle, for £165 tax per year. I also changed the body style, from Panel Van (which was incorrect) to Minibus. Added the number of seats (four) which was missing from the form.

I have to leave the vehicle off public roads for up to 10 working days. Then I can check online if the vehicle has been taxed properly, and then I will be able to use it.

First Modifications

As a first step I decided to move the passenger seat further to the front. So I removed the railing that was mounted near the entrance, inside near the steps. This is how it looked before:


I was able to remove the screws. Can use those screwing points for some additional mounting in the future. Now the single passenger seat is at least further to the front. With lots of legroom - I may place there some kind of foldable extendable foot rest. And this is how this space looks now:


Moving the seat forward was no problem. I took the largest spanner I had - it fit perfectly, and I was able to loosen all the 6 screws. Then I could move the mounting points forward within those rails at the bottom. Very useful.

Here are pictures of other seats in the bus:


Friday 14 October 2016

Motor Temperature OK?

After 1/2 hour of driving the temperature indicator shows this:


Is this OK? The temperature seems barely to be above the minimum - I think it should be in the center, and the indicator should be horizontal. The van got warm inside, but not overly warm. There is an additional heater under the seats: this makes a lot of noise when switched on, because this is basically a loudly blowing fan. Warm air comes out, but not really hot. Is this the heat from the coolant? I could not see id this has a local heat exchanger... I may have to install my own heating system, based on the diesel water heater which I bought in 2014 for my microcamper, but never got around to install there.

Thursday 13 October 2016

First Problem: Water Ingress

Yesterday evening I did a closer inspection of the van. Should have done it before I bought it, but I was not thinking very thoroughly then. At my first inspection on Saturday morning it looked OK, and the price was reasonable. But now I did look closer, and I noticed that the front windscreen moulding is very brittle and is broken in some sections. This means it will let the water through.

Today was a quite rainy day. The LDV stood there in the rain, and I wanted to check if some moisture got into the inside. Upon a first glance - nothing. The whole floor dry. No wet spots, while it was pouring down outside. The side windows appear to be tight. Nothing on the dashboard. So I wanted to leave the vehicle happy, but then I stepped onto the rubber floor in the driver area - and as I stepped on it, a bit of water seeped out at the opening of that rubber floor, where the driver seat is mounted. Now I saw the reason for those rusty bolts: water must have come in from underneath that rubber floor. The only reason for this I could see in the defective windscreen seal. The water probably ran down inside the seal, then dropped into the floor. I tried to identify, but in order to really find it, I would have to remove the rubber floor and check where the water was coming from.

So the next most urgent thing is to get the window seal repaired. I called AUTOGLASS - they do not do these kind of jobs. Strange, why not - but they only put new glass in. I would have thought it would be the same: to take the old glass out, put a new rubber seal around, then put it back in. But for some reason they so not put in back the old glass, but they want so sell a new glass. That is not what I need.

On some blogs I read that people tried to repair these leaks, and changing the window glass themselves is a real pain (see the comments to this blog post : Fixing water leak in LDV van). So this I will not be able to do myself - instead I am trying to find a garage. Have contacted two in Leeds, am waiting for their response.

In the meantime I started to put "stuff" into the LDV van. Some of my car repair things, some stuff from my previous conversion. Those roof shelves are great! Very sturdy, and provide lots of storage space. These roof shelfs (left and right side above the seats) will change the design I had originally for this... I will have to rethink where I put the bed and the shower. I thought I would place a bed on top, as a kind of bunk bed, but I will probably not do this, and instead keep those robust shelve in place.

This evening it continued to pour down. I decided to take the van for a random drive around Leeds, through the night and the rain. It drives really well. OK, is a bit loud, and feels like driving a truck (sorry, a lorry, for UK readers). But this is OK. It goes reasonably fast, with a slow acceleration, but is sufficient. At least I may have a better chance now driving at the speed limit and not get another speeding offence...


First Pictures

Here are the first pictures - I took them when the car was still at the dealer in Bradford.


This is the 2002 LDV 400 Convoy which I purchased yesterday.

Here are more views:


It has a bit of rust around the edges, so I will need to work on it and remove that, scrape it off, convert it, paint over it. Possibly the whole vehicle may need to get a paint job...
But first need to ensure that e everything is working OK.

Here is a picture of the interior:


Quite nice and undamaged seat covers. And the rooflight in the middle is great! This would have cost a lot to install myself - the rooflight alone could be several 100 pounds.

Wednesday 12 October 2016

Getting an LDV 400 Convoy

Already quite a while ago I had decided that I would need a larger campervan. My Fiat Doblo conversion is just too small for any serious travelling - may be fine for one single person, but for two it is just suitable for a weekend.

And so I had decided I would get something bigger. And I settled for an LDV 400 Convoy, despite the somewhat "mixed" reputation that this vehicle has. I read many reviews in which people (owners) complained about things breaking down with this van, but I also read others which praised it for its simplicity and robustness.

The deciding factor for me was the price - the LDV 400 Convoy is usually the lowest-price vehicle that one can get in this size. And I decided on a minibus. There are arguments against having all windows around in a camper van: one cannot do "stealth" camping, there is somewhat less security (glass can be broken into), also of course less privacy, and finally the heat insulation would be more difficult to achieve. But I do like to imagine that I park somewhere in a nice scenic spot and then have the full surround view of this spot from inside the car - which is helpful when it rains outside.

So last Friday I saw the ad for an LDV 400 Convoy minibus, just in the vicinity of 10 miles from home. I had a look at the vehicle on Saturday, and then later that afternoon decided that I would buy it. It claimed to have very few miles: 22,500 miles, for a vehicle from 2002, 14 years old. The seller insisted that this is the true mileage, as indicated by MOT receipts. There is some rust at the edges of the body panels, but overall the van looks good. Engine is a 2.4l Transit Duratorq, about which I also found mixed opinions. But I decided to go for it, because this van had a few interesting things going for it:

  • there was a heater installed under one of the seat. The seller did not know how to work it, but I would figure this out later. 
  • The windows were not the usual 3-windows on each side, as most LDV 400 minibuses have, but each side only had one long window, which make the vehicle look a bit more modern. 
  • And finally the van has no sliding door - entrance is only through the front - or the back. This preserves some space for potential additional furniture or equipment inside. Disadvantage is that the front passenger seat is quite recessed, because that is where the entrance space is.

The van is also nicely lined inside - it seems there had been a conversion been done, with proper insulation of the roof. There is also a rooflight inside, which would cost a lot to buy and install myself.

And the price was reasonable, I felt: £1495.

Now here are the problems I encountered:

The first problem was to get insurance. Since this is no yet a converted motorhome, I could not get motorhome insurance. One would need to have a conversion done within 120 days, but DIY conversion is often not accepted by insurers. It seemed then to be very expensive to get standard van insurance: sites like confused.com and others gave me quotes from £1200 to £7000 - ridiculous annual insurance prices. I finally settled for Aviva. When looking for quote, I noticed that the registration information did show conflicting vehicles: the vehicle came up as a Convoy, but as a smaller one. Since I did not yet have the V5 form, I settled in for whatever the vehicle registration check provided. I will have to clarify this later.

Then this morning I went on the journey, with taxi, short train ride, then again taxi, and picked up the van. The following comments:
- ride is OK, but quite loud. There is a strong resonance at low rpm in the vehicle.
- the ventilation does not have a full-close switch, as is usually a standard feature. This means when there is bad air outside, I will not be able to shut it off.
- the engine temperature seemed to remain quite cold. The temperature indicator was only slightly above the minimum, and was not in the centre of the dial as it should be.
- as a consequence of the cool engine the heating seemed to work only very faintly. The blower fan only seems to blow air at level 3 - level 2 and 1 are silent, without any air movement. The central vents only blow out cold air, unheated - heated air comes through the side vents and the vehicle vents below in the foot area.
- there is a heater / blower in the centre of the vehicle, underneath a seat. It can be turned on when the ignition is on, but it only seems to make a lot of noise and blow the air around. I did not feel any warm air coming out from it, which is disappointing. Means I will have to install an auxiliary heater.
- the rubber seals around the front window appear to be not tight anymore, appear brittle in places, so I may need to change this.

So much for the first impression. I will need to give the car a good wash, inside and outside, then will begin selling most of the seats. And I will soon sell my 1999 Peugeot Expert camper.